Oblivion:Map Exploration
Map Exploration is the section of route logic in which the player discovers all of the locations on the map to fulfill the Places Found statistic in the Accomplishments Tab.
Overview
For 100% Completion, one of the things we need to do is max out the Places Found statistic in the Accomplishments Tab. There are 367 map markers to discover on the map, broken down as follows:
 89 Caves
- Serpent’s Trail is not discoverable until you’ve reached stage 20 of Lifting the Vale.
 59 Oblivion Gates
- The Bruma Gate is not discoverable until during the Bruma Gate quest.
- The Great Gate is not a discoverable location.
- Aside from the Kvatch Gate, other Oblivion Gate locations will not be discoverable until later in the main quest. For the purposes of the speedrun, all gates aside from Bruma Gate are discoverable and should be closed between completing Dagon Shrine (when random Oblivion Gates will have the highest chance of spawning and the most total gates can spawn) and completing Paradise (when random Oblivion Gates have a lower chance of spawning and you will be unable to find more than 20, preventing you from completing this objective).
- There are 19 fixed discoverable Oblivion Gates that are always in those locations on the map. There are 40 randomly spawning Oblivion Gates that can appear at 80 different potential locations.
 50 Ayleid Ruins
- Discover Arpenia before starting the Azani Blackheart quest, or else you will never be able to discover it.
- Discover Sedor before starting The Stone of St. Alessia quest, or else you will never be able to discover it.
 50 Forts
 32 Camps
 30 Settlements
- Discover Cloud Ruler Temple before starting the Weynon Priory quest, or else you will never be able to discover it.
 25 Mines
 15 Daedric Shrines
 9 Landmarks
 8 Inns
Additionally there are several map icons which start out already discovered, which do not count towards the Places Found statistic:
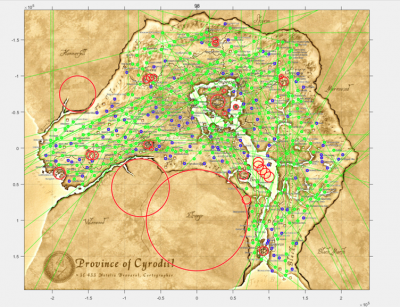
To discover a location, the player must get near enough to a map marker, which can be imagined as an invisible sphere with a radius of about 1800 pixels around the location that discovers the place once you have entered it. It is worth noting that the actual map marker with the discoverable sphere around it is separate from the entrance to a location, and is often decently far away from the entrance itself.
The current route logic theory is that map exploration is best done in one sweep rather than breaking up the exploration to be done at relevant points during individual quests. Already having all the locations discovered before doing the bulk of the questing makes the flow of quest completion much smoother, allowing us to immediately jump between locations without doing dozens of extended travel sections. Additionally, there are tons of locations that are not relevant to any quests, which we would have to discover later anyway, so doing everything at once reduces the redundancy of whatever setup we use for exploring faster. Exploring the whole map all at once also gives us more routing options since we don’t need to worry about quest timing related to problematic locations like Arpenia or Cloud Ruler Temple.
The goal is to discover all of the locations on the map as quickly as possible, but some aspects of this will change depending on route logic:
- We will likely have to ignore Bruma Gate until it is discovered during the Bruma Gate quest since that quest cannot be reach early in the run.
- We may or may not have quest progress advanced far enough in Lifting the Vale that Serpent’s Trail and all other Oblivion Gates are discoverable by the time we do map exploration.
- Due to new discoveries with Oblivion Gates, we do not need to discover the location of Random Gates or Fixed Gates (aside from Kvatch Gate) during the main part of Map Exploration, as they will automatically be discovered later with a glitch setup.
Although previously considered part of Map Exploration, other objectives such as getting the 9 Wayshrines, closing Oblivion Gates, and all the outdoor Nirnroot are no longer included in this section.
Movement Optimizations
Map exploration poses several movement problems that need to be optimized:
- Given the large size of the map, movement speed is the top priority.
- The setup time for getting a large amount of movement speed needs to be reduced as much as possible.
- The refresh time for reapplying speed buffs needs to be reduced as well. Depending on the strategy, the setup and refresh time might be the same exact process.
- The duration per cycle of buffing movement speed is challenging to improve given that custom spells only last a maximum of 2 minutes. Glitch Archaeologists have discovered a spell duration bug that may prove useful.
- The map has a very uneven terrain, resulting in fall damage extremely often.
- This means that max health needs to be sufficient for tanking very large amounts of fall damage at a time.
- The frequency of smaller fall damage also means that we need a system of health restoration.
- Fall damage reduction could also be a factor, although Acrobatics is not effective at reducing fall damage, so some other method would have to be discovered for this to be viable.
- The map's uneven terrain also results in several instances where we need to optimize the ability to scale steep hills.
Exploration Strategies
There are many facets to the options the player has when exploring the map, each with their own pros and cons in relation to each other.
Pathing Strategy
“Modern” map exploration methods utilize advanced pathing setups rather than aimless wandering. Here are the various options that have been proposed:
- Vector Theory: The idea that running in calculated, straight lines will eliminate the tedium of map exploration and make it almost entirely autonomous.
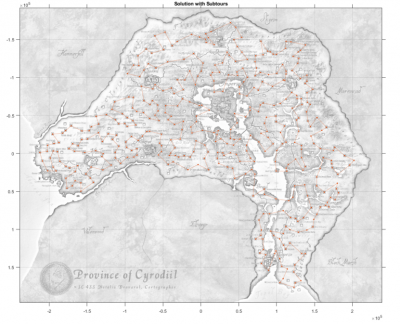
- Traveling Salesman Theory: The idea that vectors have too much backtracking, and that manually exploring in an optimized path will yield the fastest time.
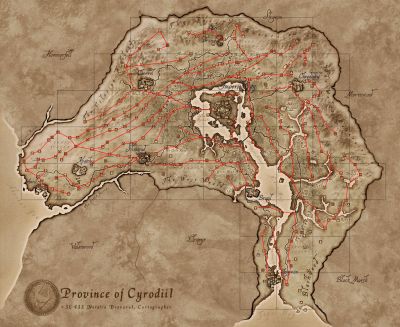
- Curved Vector Theory: The idea that creating large sweeping paths that are largely straight will give the best of the other theories: The limitless pathing possibilities of Traveling Salesman and the semi-autonomous results of Vectors.
Speed Boost Strategy
Options for achieving high movement speed are broken down into two main categories:
- Player Spell Stacking: Using a series Weakness to Magic spells reflected off of a summon, you can stack massive amounts of spell magnification onto yourself, resulting in a Speed spell on self that makes you move incredibly fast and an Endurance spell that makes you able to tank fall damage.
- The player is more easily controlled than a horse making them ideal for Traveling Salesman.
- The player spell stacking setup is more complex than the horse spell stacking strategy, requiring more spell effects to be acquired.
- Horse Spell Stacking: Horses have an unusually high movement speed per point of speed and can tank fall damage naturally, so stacking Weakness to Magic on a horse and using a Speed spell on it will give it massive movement speed boosts relatively quickly.
- The horse can scale steep slopes incredibly fast and tank fall damage.
- The horse uses tank controls, so it takes forever to turn and face a new direction, making it more ideal for Vectors/Curved Vectors than Traveling Salesman.
Map States
Additionally there is the concept of “Out of Bounds in a City” exploration vs. normal exploration:
- Normal Exploration: The map is loaded normally and can be fast traveled around freely.
- Lots of terrain/buildings make Vector Theory largely impossible, and can trip up the other navigation methods.
- If you move above 10k horse speed, the loading zones can overlap and cause crashes, making this strategy have a lower speed limit.
- Out of Bounds Exploration: Getting outside of a city while in it will result in being able to explore the map without any enemies, rocks, trees, buildings, etc. spawning.
- The biggest benefit of getting out of bounds is that loading zones do not occur when moving too fast, making the 10k horse speed issue we ran into no longer a problem.
- Horses need to be glitched into a city before they can be used in out of bounds exploration, which has a slightly more complicated setup.
- No objects loaded in means Vectors are more viable, and exploration in general is less tedious.
- We’d have to save any overlapping route logic objectives (such as killing master trainers) until all of the exploration is done. This would include closing Oblivion Gates since entering them would require us to set up the out of bounds glitch again.
- Random Oblivion Gates seem to not spawn when doing this, which could either be good or bad.
- Some city cells have the terrain fully visible, while others have no visible terrain, making navigation much harder.
Random Gate Discovery Strategy
The process of discovering Random Oblivion Gates can vary as well, and would affect pathing:
- Simultaneous Unforced: Random Oblivion Gate locations are checked as you go, moving on if one does not appear at a location.
- This makes the Vector Theory much more complicated, and makes Traveling Salesman go through more locations.
- This creates a situation where you have to go back at the end and check previous locations where the gate didn’t spawn, since they sometimes spawn on your way out of the loading zone.
- Simultaneous Forced: Random Oblivion Gate locations are checked as you go, forcing them to spawn by entering/exiting the loading zone until all 40 random gates appear.
- We have a map of locations that exist near Oblivion Gates that can be used to enter/exit until the first 40 Random Gates spawn.
- Entering/exiting a location would reset the out of bounds map state, forcing the player to clip out of bounds in a city again.
- Separate Forced: Random Oblivion Gate locations are checked entirely separate after finding all of the other locations, forcing the first 40 to spawn by entering/exiting the loading zone until they appear.
- Random Gates could appear incidentally if the player does not explore out of bounds, making this process not entirely consistent in combination with that strategy.
Gate Closing Strategy
Finally, there is the decision to close Oblivion Gates as we find them, or to ignore all of them until the end:
- Instant: Close Oblivion Gates as you encounter them during the regular exploration.
- This could interrupt the flow of certain strategies, such as Vector Theory and out of bounds exploration.
- This helps us avoid losing track of which Gate markers we’ve already closed or not.
- Delayed: Close Oblivion Gates after finding all of the locations.
- Allows us to use the new Oblivion Gate glitches that allow us to guarantee the gate layout of every random realm gate and teleport directly to them.
As you can see, there are tons of considerations and possible method combinations when developing the optimal strategy for exploring the map.
Proposed Methods
Here are some proposed strategy combinations that have been tested:
Original Horse Vectors
- Pathing: Vector Theory
- Speed Boost: Horse Spell Stacking
- Map State: Normal Exploration
- Gate Discovery: Separate Forced
- Gate Closing: Delayed
This was the setup used to test Horse Vectors prior to a glitch being discovered that could put them out of bounds on the map. The obstacles in the terrain made the vectors near impossible to execute in most cases. This was determined to be not viable.
MrBosch's Theoretical Ideal
- Pathing: Traveling Salesman Theory
- Speed Boost: Player Spell Stacking
- Map State: Out of Bounds Exploration
- Gate Discovery: Simultaneous Forced
- Gate Closing: Delayed
This setup is theoretically the most optimized strategy, but due to current route logic, it isn't possible to do Simultaneous Forced gate discovery since the main quest is not advanced far enough at the time of map exploration.
Player vs. Horse
With all of the previous information in consideration, here is a summary of optimized tech for horses and players to explore the map.
Horse
Horse optimizations were effectively solved, with little more foreseeable room for improvement. Given the larger potential of player movement, this section is mainly here for posterity.
Horses were initially considered for improving map exploration because of the Crack Horse glitch and their ability to scale steep hills by slightly turning left and right. Since horses gain a much larger speed boost per point of speed compared to the player, their setup/refresh time is shorter than buffing player speed. By using Weakness to Magic Stacking, a horse can have its speed exponentially increased in only a handful of casts. The setup uses the following spell, which we make two copies of:
- Fortify Magicka 100 pts, 4 secs on self
- Fortify Speed 3 pts for 120 secs on touch
- Fortify Restoration 50 pts for 4 seconds on self
- Weakness to Magic 100% for 4 secs on touch
Casting two hotkeys of this spell back and forth on Shadowmere results in her having ~950 speed. See the Spell Stacking page for info on why this setup works. It was discovered that the normal map exploration limit is approximately 1,000 speed, at which point the game crashes trying to load too many zones at once. Horses normally can't enter a city, but if the player casts a Command Creature spell on their horse and pays a fine/goes to jail while the effect is active, the horse will spawn in the city with the player, allowing them to then go out of bounds to explore the map.
Horses in general are able to sustain more fall damage than a lower level player, often taking several massive falls before dying. Horses do not regenerate health quickly, and it would be too tedious to manually monitor the horse's health to heal it as we explore. Of all the horses in the game, Shadowmere has the most health and has a unique ability. Unlike other horses, Shadowmere does not die when she runs out of health, she becomes unconscious. While she is unconscious, the player can put items in her inventory, including potions. When Shadowmere takes damage, she automatically will consume a potion in her inventory that restores health. She also has infinite carry weight, meaning you can put thousands of healing potions on her. This makes her the ideal horse for map exploration because she will heal herself automatically after every fall, and can take significant damage per fall. Even if Shadowmere goes unconscious, you can wait for her to wake up and resume map exploration, so there is much more room for error than with other horses. A small note is that there is a bug with Shadowmere's potion drinking mechanic. In situations where she is wakes up from being unconscious, you may have to quicksave/quickload to get her to start drinking potions automatically again. Despite all of the promising tech, Shadowmere is acquired incredibly late into the Dark Brotherhood questline, making her unlikely to be useful since the map needs to be explored as early as possible.
Player
The player is significantly more fluid to control compared to the horse's tank controls, but requires more steps to set up spell stacks on. The player cannot apply Weakness to Magic stacks to themselves unless they reflect the spell off of a creature first using Reflect Spell.
Previous Methods
Version 1
The V1 system of exploration was to simply follow an online map using hotkeyed Skooma. There was no routing, with locations being picked up randomly in an improvised fashion. All the Wayshrines were discovered during this section, and Oblivion Gates were closed as they were discovered. The V1 strategies proved very problematic for several reasons:
- The original location count on the UESP was off by one, fixed gate locations were not known to exist, and the map we used had too many additional pieces of information.
- Skooma caused the player to pass out frequently from jumping, and the damaged intelligence prevented us from farming magic skills during this part.
- The player died extremely easily from fall damage given the steepness of the terrain combined with the high movement speed.
- Given the lack of a clear route to pick up locations, the process felt largely aimless.
- Missing random Oblivion Gates and having to revisit all the previous locations to find the missing ones wasted a lot of time.
Version 2
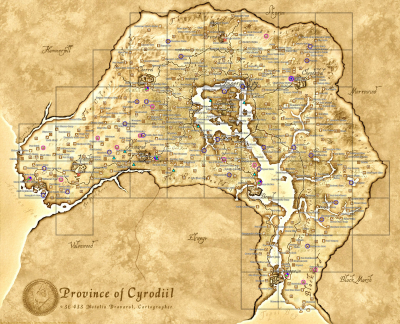
The V2 system clarified several things, including making a more customized map with reduced/corrected information, and adding a grid system that gave a rough idea of how to tackle the map in sections. Overall the strategy was largely unchanged, although perma enchants allowed us to not use Skooma, making navigation of the map a little less tedious and allowing us to farm magic/acrobatics during this time. We still discovered Oblivion Gates as we closed them. There were some issues that still persisted:
- We were still unaware of fixed gate locations at the time, so Oblivion Gate discovery was still inefficient.
- The player still died extremely easily from fall damage.
- The grid system helped give the runners a more systematic approach to map exploration, although it was still very vague and required the players to improvise the order they tackled sectors.
- The random Oblivion Gates that didn’t spawn by the end of the route were still difficult to track down at the end.
- Wayshrines were still integrated into this section rather than being collected when already at nearby locations later.
Version 3
The V3 system largely improved the communication of the materials rather than the exploration tech itself. The grid system was still used, and was not improved upon. The main improvements came from learning about fixed gate locations, double fame gates, and random layouts gates, which all made map exploration much more concrete and clear to the runner. Wayshrines were added to the exploration phase as well. Oblivion Gates were still closed as we found them, but with our new knowledge of fixed gates, we were able to create a system of tracking the random locations that gates didn’t appear at as we went, which made finding the missing gates much easier at the end. We also learned that we could force random Oblivion Gates to spawn by reloading a loading zone over and over, and that gates could spawn incidentally from crossing over a zone unknowingly, resulting in gates appearing at places we had already checked before. This system still had some problems:
- The player still died extremely easily from fall damage.
- The grid system was still vague and inefficient.
- Wayshrines were still integrated into this section rather than being collected when already at nearby locations later.
The completion of V3 marked what appears to be the maximum potential of this general system, indicating that it was time to completely rethink how we explored the map. Player speed was incredibly slow for how much map there was to cover, and things like fall damage made the exploration tedious and inefficient.


